Saturday, April 12, 2014

Sewing Room Desk

I needed some desk space in my sewing room... not much... just a little space for my lap top, a place to collect mail and receipts, stash random cords (sewing machine connectors, phone chargers, etc)and keep bits of info I needed to find later.  I have several bookcases in my sewing room that hold fabric, pattern books and project bins.  My hubby cut me a shelf that was a little deeper than the existing shelves and I positioned it about the same height as my sewing table.
 
 
I put some in wooden desk organizers for papers and file folders just below the shelf as well as a basket for cords, chargers, and sewing machine computer related items.  I took a scrap of foam board, covered it with cute fabric and ribbon to make a bulletin board that fills the space behind the shelf.  It's kind of hard to see here but I also put a pieces of wood painted white on either side of the bulletin board to hold the shelf tight.  (so it wouldn't flip forward if I leaned on it)


I covered a box with the same cute button fabric I used on the bulletin board to temporarily hold  receipts and other miscellaneous papers that I need to save for my business.  I have a tendency to lose those things when my shopping bags "hit" my sewing room.  This is a quick place to stuff them until I can sort them out properly, file them and get them entered into my computer. 
 
I've been using this set up for a couple of months now and it works great.  I can find all my receipts, cords,  and other stuff I used to waste a bunch of time hunting for.  Yoo-hoo!

Thursday, February 20, 2014

Tension Rod Storage

My cutting table, ironing board, and sewing table are always littered with scissors, cutters, TV remotes and bits and pieces of "stuff" I'm planning to put away.  I really needed handy access to often used tools and a place to corral all those little things I plan to put away later.  I saw some clever posts in Pinterest that used curtain tension rods under the bathroom sink to store cleaning supplies.  Here's how the idea and being lucky enough to have an Ikea within driving distance inspired me.

I found these inexpensive containers with a lip that just fits over a curtain tension rod. 
My sewing machine is in front of a window.  I put a tension rod in the window and used the containers I found at Ikea.  Now I have places for scissors, seam rippers, spools of thread, sewing machine oil... you get the idea.
I put another tension rod in front of my books in the bookcase.  I added containers for cutters, pencils, and small rulers keeping my cutting surface free from clutter and making my tools easier to find.  They aren't buried under fabric and pattern pieces any more.  
Not lucky enough to have access to Ikea?  Pinterest has several pins with instructions for making hanging storage containers using curtain rods and even embroidery hoops.  I just used an s-hook through the screw mechanism on the embroidery hoop to hang it over the curtain rod.  I encourage you to get a nice cup of tea, a comfy chair and spend a little time surfing Pinterest for your own inspiration.

Wednesday, February 19, 2014

Undiscovered Storage

I can always use more storage.  I have items I seldom use, but... when I need them, I need them... so I don't want to get rid of them. Ii have bulky stuff... sewing machine cases, pressing hams, I also have jars of beads and other small craft items.  My solution was to: GO UP!
This is the space above the door into my sewing room.  My hubby added a deep shelf for me just above the door and it's a perfect place to store my sewing machine covers and cases as well as pressing hams.  I don't need them often so the fact that I need to get a stool to get them down isn't a problem.
Putting a shelf the length of the wall about a foot down from the ceiling gave me space to store all the odd things I need "once in a while"... jars of wooden beads, pearls, instructional tapes and DVDs, bias tape makers... etc.  Note:  The shelf is level it looks weird because my ceiling is vaulted.  The measurement is from the lowest part of my ceiling.  (See my iron cord?)  I mentioned in an earlier post that hooking my cord up high keeps it out of the way.)
I have a bunch of mat "thingies"... a white slippery one with a hole in the middle for machine quilting; a couple that are sticky on both sides; some applique pressing sheets;  Store them under your the mat on your cutting table.  They stay flat and they're easy to find.  This smart tip came from my sister, Marilyn.  Thanks, Mare!
I have a bunch of rolls of stuff... chalkboard cloth, vinyl, screening, headliner, etc.  A simple five gallon bucket keeps them collected and it fits easily in the corner of my closet.

Sunday, February 9, 2014

Ironing Surface


How old is my ironing board?  The legs are harvest gold if that tell you anything.  Since I am an avid quilter at this point in my sewing life I really need more wide surface and that "long pointy end" pretty much goes to waste.   I also needed to be able to move it easily because my sewing room is very small and it stands in front of my design wall.

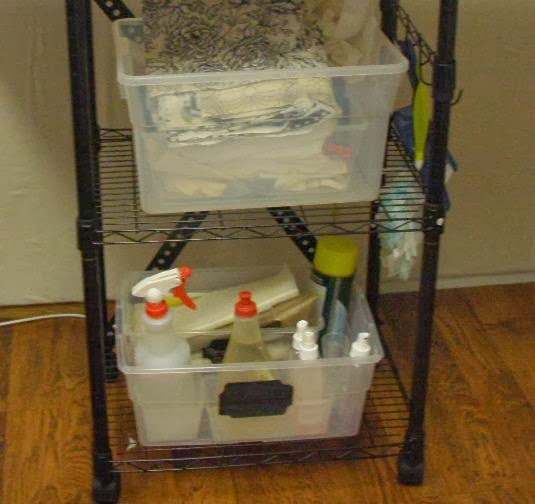
I purchased a small roll around cart from Walmart.  With my hubby's help we replaced the top to
give me more overall space with a smaller foot print.  The shelves allow for additional storage.


I measured the plastic containers I wanted to use and placed the shelves to fit the containers.  Now all my pressing clothes.  applique pressing sheets, starch, filling container for my iron, etc.  are within easy reach.  


After putting the cart base together we added some extra bracing to the back using some metal strips and plastic electrical clamps.  Chuck painted the metal black to match the legs  before attaching them.


Black knobs on the wooden top that came with the cart just drop into the hollow metal tubes that are the legs.  We purchased a large dowel, cut it into four sections and screwed them into a piece of oak plywood 20" x 42" we already had in the garage.  Chuck rounded off the corners.  We put the dowels into the tubes.  (I didn't think to take pictures until I we were finished so I did a quick sketch.)


I made a cover using one layer of Warm and Natural batting and muslin.  I cut the muslin about four inches larger all the way around;  put a casing along  the edge and used 1/4" elastic for the string.  I pulled the elastic tight and tied it to make the cover fit snugly over the wood.  It's easily removed to be washed or replaced.


Ta-dah!  Because it has locking casters on the bottom it stays in place when I'm pressing and is easily moved out of the way when I need my design wall.  It's also the same height as my cutting island so I can easily slide the two together and have an extra large horizontal surface if I need it.  

Last, I had access to electricity near the ceiling on this wall so I was able to plug my iron in "up high".  The cord doesn't drag along the floor anymore.  (I've lost more than one iron because I caught my foot in the cord and pulled the iron off onto the floor.

Sunday, January 19, 2014

Lap Top Tote released January 2014

Our newest pattern is out.  I recently replaced my sister's set of Enchanted Valley Arts patterns and don't you know I just couldn't send her an envelope full of "stuff".  Before I went to quilt market last may I created a carrier for a small art portfolio containing my pattern line and my business cards and fliers.  This new pattern is a "spiffed up" version of that design.  
The soft-sided case is approximately 17" wide and 15" high.  It it designed to carry a lap top, tablet, or small art portfolio.  The outside pockets will easily hold legal sized papers.  Fill the coordinating business card holder to complete a unique professional look.  The pattern retails for $9.00 and is available locally as well as the website.  www.enchantedvalleyarts.com 
Here are a couple of other fabric examples.


New Fabric Cutting Island


Over the years my sewing room has expanded and evolved without much of an overall plan.  Recently I emptied the entire space(Ugh!) to have the old carpeting replaced with laminate flooring.   I took that opportunity to rearrange just a bit and make some much needed improvements . 

I got rid of my old folding table with pieces of plastic pipe on the legs and “stuff” piled underneath and replaced it with a cabinet .

I purchased a finished kitchen cabinet from Home Depot.  It has one drawer and is finished on both sides.


My cousin, Dave, made me a top that fits over it and stays in place with braces shown.  It is slightly larger than  my Olfa cutting mat and has enough overhang so I don’t bump my toes on the sides or back of the cabinet. 


Dave also added a back to the cabinet made from the same material as the top.  (I painted it white to match the rest of the cabinet surface using left over paint from  my kitchen cupboards.)  The rail, hooks and container are from Ikea.  I used Command Hooks on one side for hanging my large square ruler.


My hubby installed shelves in the lower section and I used plastic containers as drawer dividers.  If you’re like me I've accumulated lots of marking, pinning, and other odd small tools over the years.  This gave me opportunity to “round them all up”, sort though them and finally put them someplace where I can find them easily.


We put felt glides on the bottom.  Since my  sewing room is small I can move it easily to gain full use of my design wall, or get into closets, book cases and fabric storage.